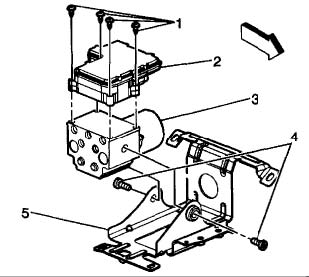
Chevrolet S10 and Hombre ABS Removal Instructions
Removal Procedure:
Important:
- After installation, calibrate the new EBCM to the tire size that is appropriate to the vehicle. Refer to Tire Size Calibration portion of Scan Tool Diagnostics.
- Thoroughly wash all contaminants from around the EHCU. The area around the EHCU must be free from loose dirt to prevent contamination of disassembled ABS components.

1. Disconnect the electrical connectors from the EBCM (2).
2. Remove the four T 25 Torx mounting screws (1) that fasten the EBCM (2) to the BPMV (3).
3. Remove the EBCM (2) from the BPMV (3). Removal may require a light amount of force. Important: Do not use a tool to pry the EBCM or the BPMV. Excessive force will damage the EBCM.
4. Clean the BPMV (3) to EBCM (2) mounting surfaces with a clean cloth.
Installation Procedure:
1. Install EBCM (2) on to the BPMV (2). Notice: Refer to Component Fastener Tightening Notice in Service Precautions.
2. Install the four new T-25 Torx screws (1 ) in the EBCM (2). Tighten Tighten the four T-25 Torx screws to 5 Nm (39 inch lbs.) in an X-pattern.
3. Connect the electrical connectors to the EBCM (2).
4. Revise the tire calibration using the Scan Tool Tire Size Calibration function. Refer to Scan Tool Diagnostics.
5. Return to A Diagnostic System Check (310 ABS) or A Diagnostic System Check (325 ABS).
Download a pdf of these instructions here
