1998-1999 Corvette Climate Controller Removal Instructions
Control Assembly Replacement
REMOVAL PROCEDURE:

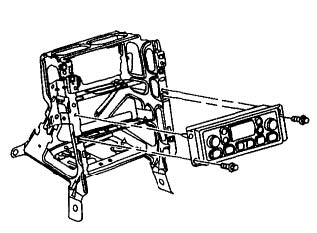
1. Disconnect the negative battery cable.
2. Remove the I/P accessory trim plate. (Instrument Panel)
3. Remove the HVAC control head retaining screws.
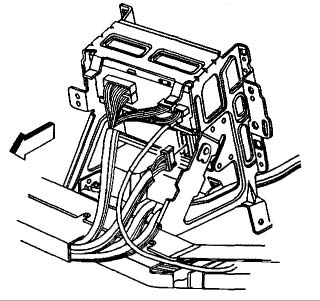
4. Pull the control head out from the I/P center support bracket to access the electrical connector

5. Disconnect the electrical connector from the control head.
6. Remove the control head from the vehicle.
INSTALLATION PROCEDURE:
1. Connect the electrical connector to the HVAC control head.
2. Install the control head to the I/P center support bracket. NOTE: Refer to Fastener Notice in Service Precautions.
3. Install the HVAC control head retaining screws. Tighten Tighten the HVAC control head retaining screws to 1.9 N.m (17 lb in).
4. Install the I/P accessory trim plate.
5. Connect the negative battery cable. Tighten Tighten the negative battery cable bolt to 15 N.m (11 lb in).
6. Program the transmitters. Refer to Transmitter Programming/Synchronization in Keyless Entry.
--------------------------------------------------------------------------------------------
Transmitter Programming/Synchronization in Keyless Entry
When battery is disconnected this must be performed.
Transmitter Programming/Synchronization
Each transmitter has a unique Vehicle Access Code (VAC) that changes every 5 seconds. If a transmitter or receiver is replace, each transmitter must be programmed to the vehicle's receiver. Entering a specific button sequence on the DIC, up to three transmitters can be programmed into the receiver. After programming the transmitters to the vehicle, the receiver will update this code every 5 seconds in order to match the code programmed in the transmitter.
The transmitter may not communicate or become out of synchronization with the receiver if any of the following situations occurs:
- The transmitter battery is disconnected.
- The vehicle battery is disconnected.
- The transmitter and the vehicle are separated for 2 weeks or more.
- The receiver is disconnected.
Perform the synchronizing procedure if the transmitter does not communicate or becomes out of synchronization with the receiver. If the transmitter and/or receiver are replaced, preform the following programming procedure:
Programming Transmitters:
1. Turn the ignition to ON.
2. Turn the radio to OFF.
3. Press the RESET button in order to clear any IPC warning messages.
4. Press and release the OPTIONS button on the DIC to scroll through the display optionsuntil the IPC display is blank.
5. Press and hold the RESET button for 3 seconds.
6. Press the OPTIONS button until FOB TRAINING message is displayed.
7. Press the RESET button in order to begin the programming sequence. The message HOLD LK + UNLK 1ST FOB will be displayed.
8. Simultaneously press and hold the LOCK and UNLOCK buttons on the first transmitter for 15 seconds. The IPC will indicate when that transmitter is programmed and when to proceed to the next. Repeat this procedure for each additional transmitter or press the OPTIONS button to exit.
Programming Cancellation
- The receiver will cancel the programming sequence if any of the following conditions occur:
- The program mode is exited through the DIC.
- The ignition is turned to OFF.
- The three transmitters have been programmed.
- The RFA system has been in the program mode for longer than 2 minutes and no transmitters have been learned.
If the program mode is cancelled with less than three codes stored, the receiver will only accept the codes just stored. If the program mode is cancelled before any code is stored, the codes still remain valid.
The receiver retains all current access codes in memory if either of the following conditions occur:
- A programming sequence is interrupted.
- The battery is disconnected.
Synchronizing Transmitters
Preform the following procedure if a transmitter cannot communicate or becomes out of synchronization with the receiver:
1. Move a programmed transmitter within range.
2. Press the LOCK and UNLOCK buttons on the transmitter simultaneously for 7 seconds.
3. The horn will chirp once when the transmitter is synchronized. Repeat this procedure for each additional transmitter if needed.
Download a pdf of these instructions here
