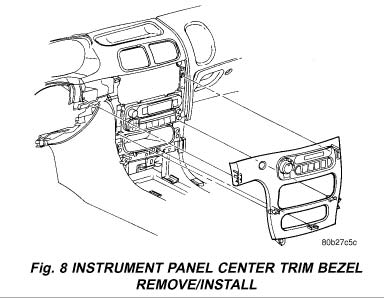
Chrysler 300M Climate Controller Removal Instructions
REMOVAL:
 |
 |
WARNING: On vehicles equipped with airbags, disable the airbag system before
attempting any steering wheel, steering column, or instrument panel component diagnosis
or service. Disconnect and isolate the battery negative (ground) cable, then wait two
minutes for the airbag system capacitor to discharge before performing further diagnosis
or service. This is the only sure way to disable the airbag system. failure to take the proper
precautions could result in an accidental airbag deployment and possible personal injury.
- Open hood and disconnect the negative battery cable remote terminal from the remote battery post.
- Remove the ash receiver assembly, if necessary
- Remove the instrument panel center trim bezel and remove the two electrical connectors
from the back of the control head and traction control switch (if equipped). - From the back of the center trim bezel, remove the six retaining screws from the a/c
heater control head and remove from the bezel.
INSTALLATION
- Place the control into place on the back of the instrument panel center bezel and install
the six retaining screws to the a/c heater control. - Connect the two electrical connectors to the back of the control head and traction control
switch (if equipped). - Install the instrument panel center bezel.
- Install the ash receiver assembly if necessary.
- Connect the negative battery cable remote terminal to the remote battery post.
- To allow the BCM to learn the new control head, perform HVAC system calibration. Refer
to Heating & Air Conditioning / Testing and Inspection / Non-Trouble Code Procedures /
HVAC System Calibration
Download a pdf of these instructions here.
