1997 Catera ABS Removal Instructions
REMOVAL PROCEDURE:
Notice: Always connect or disconnect the wiring harness connector from
the EBCM/EBTCM with the ignition switch in the OFF position. Failure to
observe this precaution could result in damage to the EBCM/EBTCM.
Notice: Avoid getting water, brake fluid or engine coolant into the socket of
the EBCM/EBTCM connector. Failure to observe this precaution could
result in damage to the EBCM/EBTCM.
Important: A faulty EBTCM cannot be repaired. The EBTCM must be
replaced as an assembly.
1. Disconnect the negative battery cable. Refer to Battery Disconnect
Caution in Cautions and Notices.

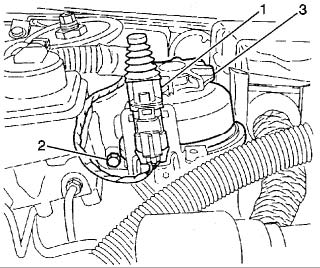
2. Remove the hood contact switch (1).
3. Remove one power steering fluid reservoir screw (2).
4. Lay the fluid reservoir (3) to one side.

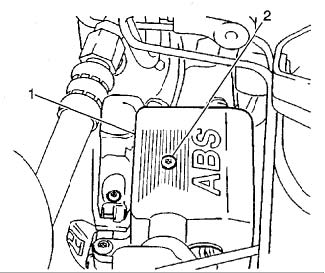
5. Remove one EBTCM cover screw (2).
6. Remove the EBTCM cover (1).

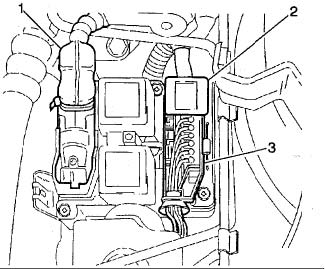
7. Unlock the EBTCM 25-pin electrical connector tab.
8. Remove the EBTCM 25-pin electrical connector (1).9. Remove the EBTCM 4-pin electrical connector (2).
10.Remove the EBTCM 6-pin solenoid valve connector (3).

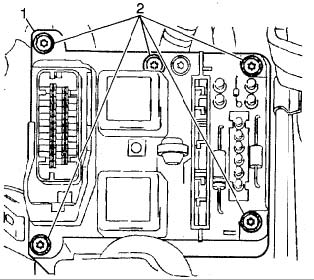
11.Remove the five EBTCM to bracket screws (2).
12.Remove the EBTCM (1) from the bracket.
INSTALLATION PROCEDURE:
1. Install the EBTCM (1) to the bracket.
2. Install the five EBTCM to bracket screws (2). Tighten the five EBTCM to bracket screws to 1.5 Nm (13.28
inch lbs.) .
3. Install the EBTCM 6-pin solenoid valve connector (3).
4. Install the EBTCM 4-pin electrical connector (2).
5. Install the EBTCM 25-pin electrical connector (1).
6. Check that the tab locks are in place.
7. Install the EBTCM cover (1).
8. Install the one EBTCM cover screw (2).
9. Install the power steering fluid reservoir (3).
10.Install the hood contact switch (1).
11.Reconnect the negative battery cable.
12.Perform the Diagnostic System Check
Download a pdf of these instructions here
